How to migrate accounts from CWP to CWP: Difference between revisions
Jump to navigation
Jump to search
(Created page with "'''<big>Introduction</big>''' <big>In this article, you will learn how to migrate accounts from CWP to CWP.</big> '''<big>what is cwp?</big>''' <big>Control Web Panel – an AI powered Free Web Hosting control panel designed for quick and easy management of (Dedicated & VPS) as well as offering an intuitive and modern interface for users, as a web hosting panel.</big> '''<big>SOURCE SERVER</big>''' # <big>Go to “CWP Settings” > “API Manager” in the le...") |
mNo edit summary |
||
| Line 1: | Line 1: | ||
=== <big>Introduction</big> === | |||
<big>In this article, you will learn how to migrate accounts from CWP to CWP.</big> | <big>In this article, you will learn how to migrate accounts from CWP to CWP.</big> | ||
==== <big>what is CWP?</big> ==== | |||
<big>Control Web Panel – an AI powered Free Web Hosting control panel designed for quick and easy management of (Dedicated & VPS) as well as offering an intuitive and modern interface for users, as a web hosting panel.</big> | <big>Control Web Panel – an AI powered Free Web Hosting control panel designed for quick and easy management of (Dedicated & VPS) as well as offering an intuitive and modern interface for users, as a web hosting panel.</big> | ||
'''<big>SOURCE SERVER</big>''' | '''<big>SOURCE SERVER</big>''' | ||
<big>Go to “CWP Settings” > “API Manager” in the left menu.</big> | |||
[[File:B1.png|center|thumb|602x602px]] | [[File:B1.png|center|thumb|602x602px]] | ||
*<big>Generate and save the new API key by using the green button “Allow New API Access”</big> | |||
[[File:B2.png|center|thumb|573x573px]] | [[File:B2.png|center|thumb|573x573px]] | ||
| Line 23: | Line 21: | ||
<big>Click on '''Generate code'''</big> | <big>Click on '''Generate code'''</big> | ||
<big>Format request: | <big>Format request: '''JSON'''</big> | ||
<big>Enable function for: '''CWP to CWP Migration''', then click on '''Create'''</big> | <big>Enable function for: '''CWP to CWP Migration''', then click on '''Create'''</big> | ||
* <big>Go to '''Dashboard > Firewall''' and whitelist the '''Source IP''' and '''Destination IP'''</big> | |||
[[File:B3.png|center|thumb|566x566px]] | [[File:B3.png|center|thumb|566x566px]] | ||
* <big>Under '''Whitelist Configuration''', Click on '''Add an entry''': Source IP and Destination IP</big> | |||
<big>Under '''Whitelist Configuration''', Click on '''Add an entry''': Source IP and | |||
[[File:B4.png|center|thumb|602x602px]] | [[File:B4.png|center|thumb|602x602px]] | ||
* <big>Search '''SSH Key Generator''' in the left search box, click on '''Generate an SSH key''', from the Server “'''Settings'''” module -> “'''SSH Key''' '''Generator'''”</big> | |||
<big>Generate '''new key''' and '''Add a Public key''' to authorized</big> | * <big>Generate '''new key''' and '''Add a Public key''' to authorized</big> | ||
'''<big>DESTINATION SERVER</big>''' | '''<big>DESTINATION SERVER</big>''' | ||
* <big>Login to CWP of destination server</big> | |||
<big> | * <big>Go in firewall then whitelisted the Source IP and Destination IP</big> | ||
[[File:B5.png|center|thumb|568x568px]] | [[File:B5.png|center|thumb|568x568px]] | ||
<big> | * <big>Generate an SSH key, from the Server “Settings” module -> “SSH Key Generator”</big> | ||
<big> | * <big>Generate new key and Add a Public key to authorized</big> | ||
<big> | * <big>Login destination server via putty, then</big> | ||
<big>Password:yxyxyxyx</big> | {| class="wikitable" | ||
|+ | |||
|<big>ssh-copy-id root@x.x.x.x > source IP</big><big>Password:yxyxyxyx</big> | |||
|} | |||
<big>6. User accounts> CWP->CWP migration</big> | * <big>6. User accounts> CWP->CWP migration</big> | ||
[[File:B6.png|center|thumb|566x566px]] | [[File:B6.png|center|thumb|566x566px]] | ||
<big>Server IP: source IP</big> | {| class="wikitable" | ||
|+ | |||
|<big>Server IP: source IP</big> | |||
|} | |||
<big> | * <big>API Key cPanel: Paste key which is generated in source server</big> | ||
<big>Maximum simultaneous transfers: according to you select maximum number of accounts transfer</big> | * <big>Maximum simultaneous transfers: according to you select maximum number of accounts transfer</big> | ||
<big>Test and save</big> | <big>Test and save</big> | ||
<big> | * <big>Click on the authentication method, and select what you want to migrate</big> | ||
<big> | * <big>And start migration</big> | ||
<big>'''NOTE''': you can check the migration log with the following command</big> | <big>'''NOTE''': you can check the migration log with the following command</big> | ||
{| class="wikitable" | |||
<big> | |+ | ||
|<big>*tail -f /var/log/cwp/account_transfer.log*-</big> | |||
|} | |||
<big>Hopefully, you have learned how to migrate accounts from CWP to CWP.</big> | <big>Hopefully, you have learned how to migrate accounts from CWP to CWP.</big> | ||
Latest revision as of 10:53, 23 August 2025
Introduction
In this article, you will learn how to migrate accounts from CWP to CWP.
what is CWP?
Control Web Panel – an AI powered Free Web Hosting control panel designed for quick and easy management of (Dedicated & VPS) as well as offering an intuitive and modern interface for users, as a web hosting panel.
SOURCE SERVER
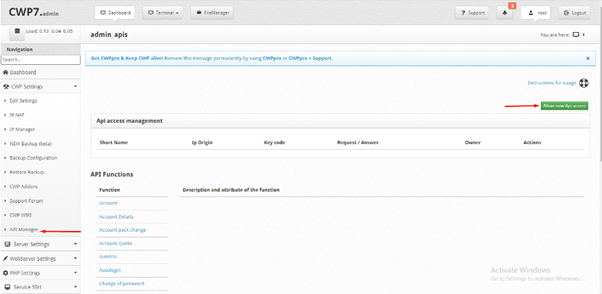
Go to “CWP Settings” > “API Manager” in the left menu.
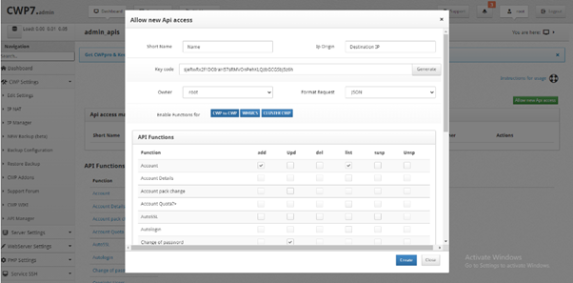
- Generate and save the new API key by using the green button “Allow New API Access”
IP origin: IP destination
Click on Generate code
Format request: JSON
Enable function for: CWP to CWP Migration, then click on Create
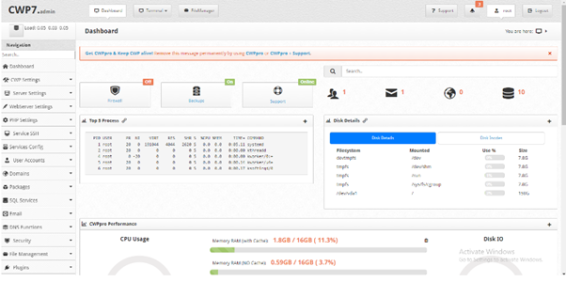
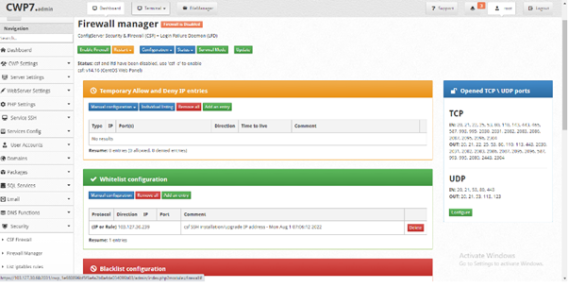
- Go to Dashboard > Firewall and whitelist the Source IP and Destination IP
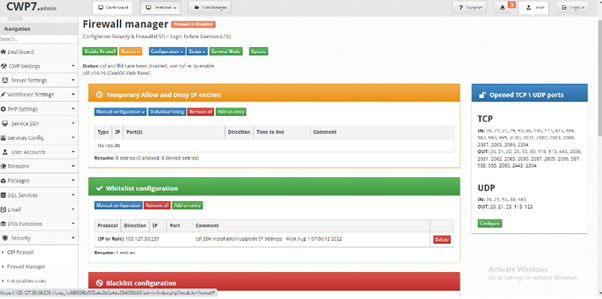
- Under Whitelist Configuration, Click on Add an entry: Source IP and Destination IP
- Search SSH Key Generator in the left search box, click on Generate an SSH key, from the Server “Settings” module -> “SSH Key Generator”
- Generate new key and Add a Public key to authorized
DESTINATION SERVER
- Login to CWP of destination server
- Go in firewall then whitelisted the Source IP and Destination IP
- Generate an SSH key, from the Server “Settings” module -> “SSH Key Generator”
- Generate new key and Add a Public key to authorized
- Login destination server via putty, then
| ssh-copy-id root@x.x.x.x > source IPPassword:yxyxyxyx |
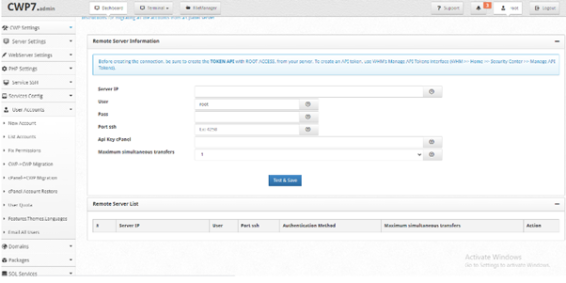
- 6. User accounts> CWP->CWP migration
| Server IP: source IP |
- API Key cPanel: Paste key which is generated in source server
- Maximum simultaneous transfers: according to you select maximum number of accounts transfer
Test and save
- Click on the authentication method, and select what you want to migrate
- And start migration
NOTE: you can check the migration log with the following command
| *tail -f /var/log/cwp/account_transfer.log*- |
Hopefully, you have learned how to migrate accounts from CWP to CWP.
