Create-&-manage-databases: Difference between revisions
Jump to navigation
Jump to search
(Created page with "== How to create and manage database in cPanel? == <big>Here are the steps to create database in cPanel:</big> '''<big>step-1</big>''' <big>create a new MySQL database by opening your cPanel and clicking on MySQL Databases section:</big> center|thumb|736x736px <big>Then, enter the database name and click on Create Database:</big> center|thumb|800x800px <big>'''step-2:'''</big> <big>Now create a new User for database by adding de...") |
No edit summary |
||
| Line 1: | Line 1: | ||
== | === 1. What is database in cPanel? === | ||
<big> | <big>In cPanel, databases play a central role in how dynamic websites and applications function. A database is where information such as user accounts, posts, products, or settings is stored and retrieved when needed. Most commonly, cPanel supports '''MySQL or MariaDB databases''', which are widely used by applications like WordPress, Joomla, Drupal, and many custom PHP applications.</big> | ||
''' | <big>Through the '''MySQL Databases''' tool, you can create new databases, add users, and assign specific privileges, while '''phpMyAdmin''' gives you a browser-based interface to manage data directly, run queries, and import or export tables.</big> | ||
=== 2. Where Databases Are in cPanel? === | |||
* <big>Log in to '''cPanel'''.</big> | |||
* <big>Look for the '''Databases''' section. You’ll see tools like:</big> | |||
** <big>'''MySQL® Databases''' → create and manage databases and users.</big> | |||
** <big>'''phpMyAdmin''' → open a web interface to manage database tables, run SQL queries, import/export data.</big> | |||
** <big>'''MySQL® Database Wizard''' → step-by-step guide to quickly create a database, user, and assign privileges.</big> | |||
<big> | === 3. Now we will going through given steps to create database in cPanel: === | ||
'''<big>Step-1: Login to cPanel</big>''' | |||
* <big>Open your hosting cPanel account.</big> | |||
<big>''' | [[File:Cp1.webp|center|thumb|327x327px]] | ||
* <big>Scroll down and find the '''Databases''' section.</big> | |||
=== Step-2: Open MySQL Databases === | |||
* <big>Click on '''MySQL® Databases'''.</big> | |||
[[File:Ip1.png|center|thumb|736x736px]] | |||
=== Step-3: Create a New Database === | |||
* <big>In the “Create New Database” box, type a name for your database (example: <code>mydb</code>).</big> | |||
* <big>Click '''Create Database'''.</big> | |||
[[File:Ip2.png|center|thumb|800x800px]] | |||
* <big>You’ll see a success message.</big> | |||
[[File:Db.png|center|thumb|578x578px]] | |||
<big>'''Step-4: Create a Database User.'''</big> | |||
* <big>Scroll down to the “MySQL Users” section.</big> | |||
* <big>Enter a username and password for the new user.</big> | |||
* <big>Click '''Create User'''.</big> | |||
[[File:Ip4.png|center|thumb|733x733px]] | [[File:Ip4.png|center|thumb|733x733px]] | ||
'''<big>Step-5: Add User to Database</big>''' | |||
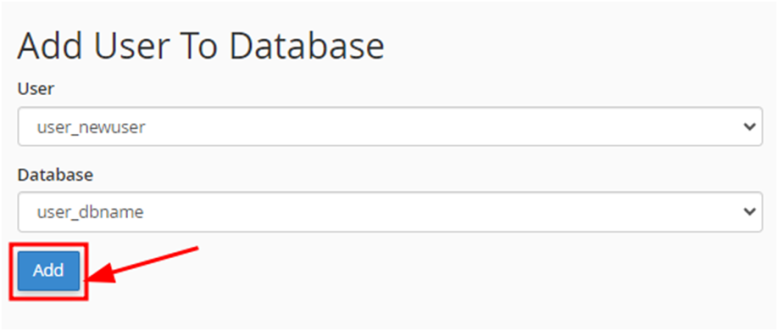
* <big>Go to the “Add User to Database” section.</big> | |||
* <big>Select the user you just created and the database you made.</big> | |||
* <big>Click '''Add'''.</big> | |||
[[File:Ip4.png|center|thumb|778x778px]] | |||
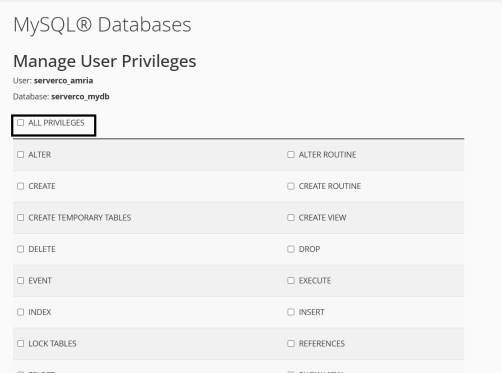
=== Step-6: Set User Privileges === | |||
<big> | * <big>On the next screen, tick '''All Privileges''' (so your user can do everything inside the database).</big> | ||
* <big>Click '''Make Changes'''.</big> | |||
[[File:Db 1.png|center|thumb|502x502px]] | |||
=== Step-7: Finally, MySQL database will be created with a user correctly associated with it. === | |||
* <big>Your database and user are now linked.</big> | |||
<big> | * <big>Use the '''database name, username, and password''' in your website’s configuration file.</big><br /> | ||
Latest revision as of 06:50, 5 September 2025
1. What is database in cPanel?
In cPanel, databases play a central role in how dynamic websites and applications function. A database is where information such as user accounts, posts, products, or settings is stored and retrieved when needed. Most commonly, cPanel supports MySQL or MariaDB databases, which are widely used by applications like WordPress, Joomla, Drupal, and many custom PHP applications.
Through the MySQL Databases tool, you can create new databases, add users, and assign specific privileges, while phpMyAdmin gives you a browser-based interface to manage data directly, run queries, and import or export tables.
2. Where Databases Are in cPanel?
- Log in to cPanel.
- Look for the Databases section. You’ll see tools like:
- MySQL® Databases → create and manage databases and users.
- phpMyAdmin → open a web interface to manage database tables, run SQL queries, import/export data.
- MySQL® Database Wizard → step-by-step guide to quickly create a database, user, and assign privileges.
3. Now we will going through given steps to create database in cPanel:
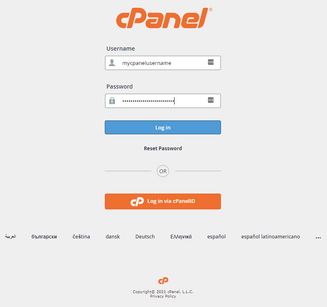
Step-1: Login to cPanel
- Open your hosting cPanel account.
- Scroll down and find the Databases section.
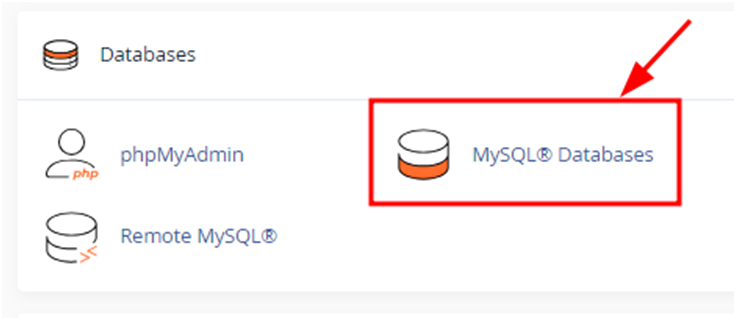
Step-2: Open MySQL Databases
- Click on MySQL® Databases.
Step-3: Create a New Database
- In the “Create New Database” box, type a name for your database (example:
mydb). - Click Create Database.
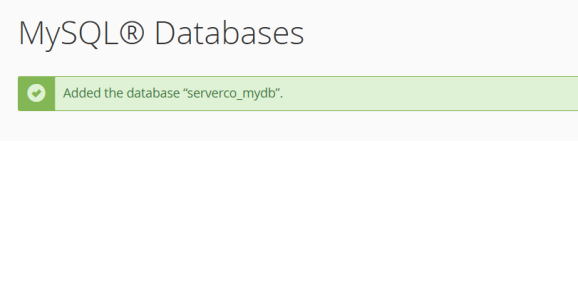
- You’ll see a success message.
Step-4: Create a Database User.
- Scroll down to the “MySQL Users” section.
- Enter a username and password for the new user.
- Click Create User.
Step-5: Add User to Database
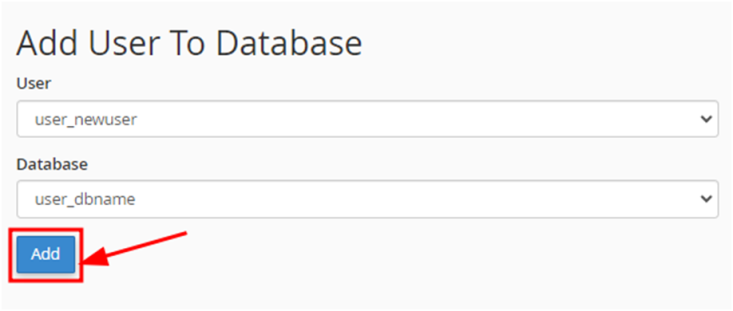
- Go to the “Add User to Database” section.
- Select the user you just created and the database you made.
- Click Add.
Step-6: Set User Privileges
- On the next screen, tick All Privileges (so your user can do everything inside the database).
- Click Make Changes.
Step-7: Finally, MySQL database will be created with a user correctly associated with it.
- Your database and user are now linked.
- Use the database name, username, and password in your website’s configuration file.
