Manage-dns-records: Difference between revisions
Jump to navigation
Jump to search
(Created page with "<big>The Zone Editor within cPanel allows clients to manage their A, CNAME, MX and TXT records. Within Zone editor a client can add, edit or remove their records, along with seeing a list of all domains and records created. To begin managing records, you can follow the guide below:</big> * <big>Enter cPanel - If you don't know how, you can follow this guide.</big> * <big>On the '''Tools''' page, in the '''Domains''' section, click '''Zone Editor''':</big> * Fi...") |
No edit summary |
||
| Line 3: | Line 3: | ||
* <big>Enter cPanel - If you don't know how, you can follow this guide.</big> | * <big>Enter cPanel - If you don't know how, you can follow this guide.</big> | ||
* <big>On the '''Tools''' page, in the '''Domains''' section, click '''Zone Editor''':</big> | * <big>On the '''Tools''' page, in the '''Domains''' section, click '''Zone Editor''':</big> | ||
# | #[[File:Domain1.png|center|thumb|602x602px]]<big>Under '''Domains''', locate the domain for which you want to add a record, and then click '''Manag'''</big>[[File:Zone1.png|center|thumb|451x451px]] | ||
# <big>Next to '''Add Record''', click the down arrow, and then click the type of record you want to add:</big> [[File:Zone5.png|center|thumb]] | # <big>Next to '''Add Record''', click the down arrow, and then click the type of record you want to add:</big> [[File:Zone5.png|center|thumb]] | ||
# <big>In the '''Name''' text box, type the fully-qualified domain name (FQDN) for the record.</big> | # <big>In the '''Name''' text box, type the fully-qualified domain name (FQDN) for the record.</big> | ||
| Line 36: | Line 32: | ||
<big>If you do not know how to log in to your cPanel account, please see [[/kb.hosting.com/docs/accessing-cpanel|this article]].</big> | <big>If you do not know how to log in to your cPanel account, please see [[/kb.hosting.com/docs/accessing-cpanel|this article]].</big> | ||
* <big>On the '''Tools''' page, in the '''Domains''' section, click '''Zone Editor''':</big>[[File:Zone1.png|center|thumb|451x451px]] | |||
* <big>Under '''Domains''', locate the domain for which you want to add a record, and then click '''Manage''':</big> | |||
* <big>Locate the record you want to edit, and then under '''Actions''', click '''Edit''':</big> | |||
* [[File:Zone2.png|center|thumb|445x445px]] | |||
* <big>Modify the value or values you want to change, and then click '''Save Record'''. cPanel updates the record.</big> | |||
Revision as of 05:50, 6 September 2025
The Zone Editor within cPanel allows clients to manage their A, CNAME, MX and TXT records. Within Zone editor a client can add, edit or remove their records, along with seeing a list of all domains and records created. To begin managing records, you can follow the guide below:
- Enter cPanel - If you don't know how, you can follow this guide.
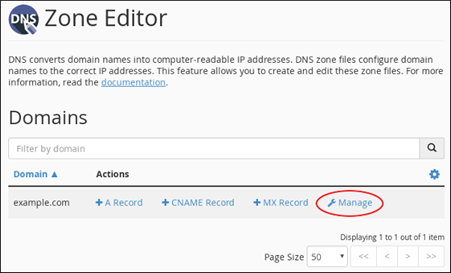
- On the Tools page, in the Domains section, click Zone Editor:
- Under Domains, locate the domain for which you want to add a record, and then click Manag
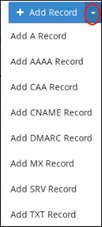
- Next to Add Record, click the down arrow, and then click the type of record you want to add:
- In the Name text box, type the fully-qualified domain name (FQDN) for the record.
- In the TTL text box, type the time-to-live value in seconds.
If you are unsure of the value to specify, type 14400 , which is four hours.
- Confirm that the Type list box contains the type of record that you want to add.
- In the Record text box, type the value for the record.
- If you are adding an A record, type the IP address to associate with the domain name that you selected in step 2.
- If you are adding a CNAME record, type the associated canonical name for the domain name that you selected in step 2.
- If you are adding a TXT record, type the data for the TXT record.
- Click Add Record. cPanel adds the record.
Editing a record
To edit a record using the Zone Editor, follow these steps:
- Log in to cPanel.
If you do not know how to log in to your cPanel account, please see this article.
- On the Tools page, in the Domains section, click Zone Editor:
- Under Domains, locate the domain for which you want to add a record, and then click Manage:
- Locate the record you want to edit, and then under Actions, click Edit:
- Modify the value or values you want to change, and then click Save Record. cPanel updates the record.


