Forward-emails-to-another-address: Difference between revisions
No edit summary |
No edit summary |
||
| (One intermediate revision by the same user not shown) | |||
| Line 1: | Line 1: | ||
'''<big>Forwarder</big>''' | |||
<big>In cPanel, you can create many email accounts. But if you have too many, it’s hard to open each one just to check messages.</big> | |||
<big>With an '''Email Forwarder''', you can set things so that:</big> | |||
* <big>Emails from one account automatically go to another account.</big> | |||
* <big>This way, you only need to open '''one inbox''' to see all your emails.</big> | |||
* <big>You can also choose to delete emails, send them to a program, or even forward all emails from one domain to another domain.</big> | |||
---- <big>'''Example:'''</big> | |||
'''Step 1''' − Open Email Forwarders by clicking on the link of '''Forwarders''' found in cPanel Home. | <big>Suppose you have these email IDs:</big> | ||
* <big>info@tutorialspoint.com</big> | |||
* <big>admin@tutorialspoint.com</big> | |||
* <big>support@tutorialspoint.com</big> | |||
<big>Instead of checking all three inboxes, you can forward '''admin''' and '''support''' to '''info@tutorialspoint.com'''.</big> | |||
<big>Now you only log in to '''info@tutorialspoint.com''' to see all emails.</big> | |||
---- <big>'''Types of Forwarders'''</big> | |||
# <big>'''Account Forwarder''' → Forwards one email address to another.</big> | |||
# <big>'''Domain Forwarder''' → Forwards all emails from one domain to another domain.</big> | |||
<big>Create an Email Account Forwarder</big> | |||
<big>'''Step 1''' − Open Email Forwarders by clicking on the link of '''Forwarders''' found in cPanel Home.</big> | |||
[[File:Fw1.png|center|thumb|600x600px]] | [[File:Fw1.png|center|thumb|600x600px]] | ||
'''Step 2''' − In the Forwarders Interface, you will find ''Create an Email Account Forwarder''. | <big>'''Step 2''' − In the Forwarders Interface, you will find ''Create an Email Account Forwarder''.</big> | ||
[[File:Fw2.png|center|thumb|600x600px]] | [[File:Fw2.png|center|thumb|600x600px]] | ||
'''Step 3''' − Press Add Forwarder Button, it will take you to a similar interface like this. | <big>'''Step 3''' − Press Add Forwarder Button, it will take you to a similar interface like this.</big> | ||
<big><br /></big> | |||
[[File:Fw3.png|center|thumb|600x600px]] | [[File:Fw3.png|center|thumb|600x600px]] | ||
<big><br /></big> | |||
<big>'''Step 4''' − Enter the Address of the email which you want to forward. It is not necessary that the email must be already created. If you do not create an email and forward it to somewhere, the only difference will be that your emails will not be stored in the mailbox of the original email, because that mailbox will not exist.</big> | |||
<big>'''Step 5''' − Enter destination where you want your email to be forwarded.</big> | |||
'''Step 5''' − Enter destination where you want your email to be forwarded. | |||
* Select ''Forward to Email Address'' and fill the textbox with an existing email, where you want your emails to be received. | * <big>Select ''Forward to Email Address'' and fill the textbox with an existing email, where you want your emails to be received.</big> | ||
* Select Discard and send an error to sender. If you want to discard that message and supply a failure message to sender. You can also customize the Failure message, enter the message in textbox. | * <big>Select Discard and send an error to sender. If you want to discard that message and supply a failure message to sender. You can also customize the Failure message, enter the message in textbox.</big> | ||
In Advance Options − | <big>In Advance Options −</big> | ||
[[File:Fw4.png|center|thumb|600x600px]] | [[File:Fw4.png|center|thumb|600x600px]] | ||
* Select ''Forward to a System Account'', if you want your emails to be sent to a system account, and provide a system account name. | * <big>Select ''Forward to a System Account'', if you want your emails to be sent to a system account, and provide a system account name.</big> | ||
* Select ''Pipe to a program'', if you want your emails to send to a program and enter path name of your program with file extension. | * <big>Select ''Pipe to a program'', if you want your emails to send to a program and enter path name of your program with file extension.</big> | ||
* Select ''Discard'' and system will simply discard the email and will do nothing. Select your choice accordingly. | * <big>Select ''Discard'' and system will simply discard the email and will do nothing. Select your choice accordingly.</big> | ||
'''Step 6''' − Click ''Add Forwarder'' to save the changes you made. | <big>'''Step 6''' − Click ''Add Forwarder'' to save the changes you made.</big> | ||
Advertisement | <big>Advertisement</big> | ||
Add Domain Forwarder | <big>Add Domain Forwarder</big> | ||
You can forward all the emails of your domain to another domain. On the domain, who will receive the emails, you can change the default email address of that domain to a single email, which then can receive all the emails sent from your domain of which you forwarded the emails. | <big>You can forward all the emails of your domain to another domain. On the domain, who will receive the emails, you can change the default email address of that domain to a single email, which then can receive all the emails sent from your domain of which you forwarded the emails.</big> | ||
'''Step 1''' − Click on ''Add Domain Forwarder'' button, which can be found under ''Create an Email Forwarder'' of Forwarder interface. | <big>'''Step 1''' − Click on ''Add Domain Forwarder'' button, which can be found under ''Create an Email Forwarder'' of Forwarder interface.</big> | ||
[[File:Fw5.png|center|thumb|600x600px]] | [[File:Fw5.png|center|thumb|600x600px]] | ||
'''Step 2''' − In Add New Domain Interface, select the domain you want to forward. | <big>'''Step 2''' − In Add New Domain Interface, select the domain you want to forward.</big> | ||
[[File:Fw6.png|center|thumb|600x600px]] | [[File:Fw6.png|center|thumb|600x600px]] | ||
'''Step 3''' − In the textbox next to your domain, enter the domain on which you will be receiving the emails. | <big>'''Step 3''' − In the textbox next to your domain, enter the domain on which you will be receiving the emails.</big> | ||
'''Step 4''' − Press ''Add Domain Forwarder'' button to save the changes. | <big>'''Step 4''' − Press ''Add Domain Forwarder'' button to save the changes.</big> | ||
Delete an Email Forwarder | <big>Delete an Email Forwarder</big> | ||
To delete an email forwarder, click on delete link corresponding to the forwarder you want to delete. | <big>To delete an email forwarder, click on delete link corresponding to the forwarder you want to delete.</big> | ||
For Email account forwarder − | <big>For Email account forwarder −</big> | ||
[[File:Fw7.png|center|thumb|600x600px]] | [[File:Fw7.png|center|thumb|600x600px]] | ||
For Domain Forwarders − | <big>For Domain Forwarders −</big> | ||
[[File:Fw8.png|center|thumb|600x600px]] | [[File:Fw8.png|center|thumb|600x600px]] | ||
<big><br /></big> | |||
<big>It will ask for your permission before deleting the forwarders, click Delete Forwarder to delete the Email Forwarder.</big> | |||
It will ask for your permission before deleting the forwarders, click Delete Forwarder to delete the Email Forwarder. | |||
Latest revision as of 06:06, 5 September 2025
Forwarder
In cPanel, you can create many email accounts. But if you have too many, it’s hard to open each one just to check messages.
With an Email Forwarder, you can set things so that:
- Emails from one account automatically go to another account.
- This way, you only need to open one inbox to see all your emails.
- You can also choose to delete emails, send them to a program, or even forward all emails from one domain to another domain.
Example:
Suppose you have these email IDs:
- info@tutorialspoint.com
- admin@tutorialspoint.com
- support@tutorialspoint.com
Instead of checking all three inboxes, you can forward admin and support to info@tutorialspoint.com.
Now you only log in to info@tutorialspoint.com to see all emails.
Types of Forwarders
- Account Forwarder → Forwards one email address to another.
- Domain Forwarder → Forwards all emails from one domain to another domain.
Create an Email Account Forwarder
Step 1 − Open Email Forwarders by clicking on the link of Forwarders found in cPanel Home.
Step 2 − In the Forwarders Interface, you will find Create an Email Account Forwarder.
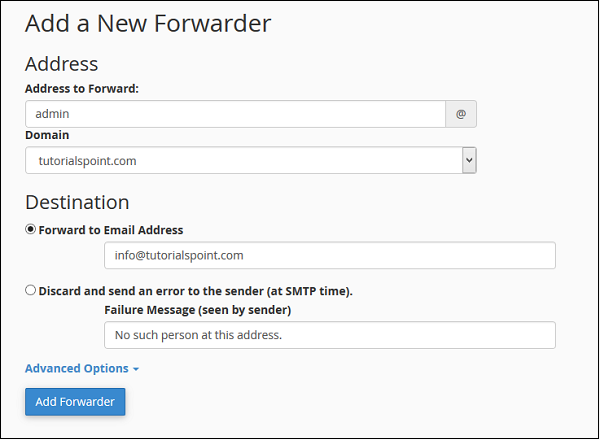
Step 3 − Press Add Forwarder Button, it will take you to a similar interface like this.
Step 4 − Enter the Address of the email which you want to forward. It is not necessary that the email must be already created. If you do not create an email and forward it to somewhere, the only difference will be that your emails will not be stored in the mailbox of the original email, because that mailbox will not exist.
Step 5 − Enter destination where you want your email to be forwarded.
- Select Forward to Email Address and fill the textbox with an existing email, where you want your emails to be received.
- Select Discard and send an error to sender. If you want to discard that message and supply a failure message to sender. You can also customize the Failure message, enter the message in textbox.
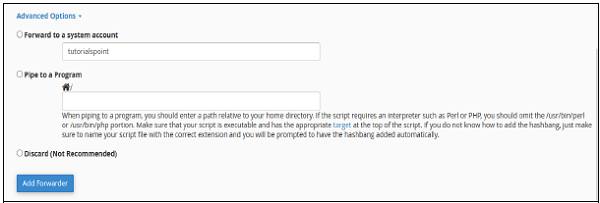
In Advance Options −
- Select Forward to a System Account, if you want your emails to be sent to a system account, and provide a system account name.
- Select Pipe to a program, if you want your emails to send to a program and enter path name of your program with file extension.
- Select Discard and system will simply discard the email and will do nothing. Select your choice accordingly.
Step 6 − Click Add Forwarder to save the changes you made.
Advertisement
Add Domain Forwarder
You can forward all the emails of your domain to another domain. On the domain, who will receive the emails, you can change the default email address of that domain to a single email, which then can receive all the emails sent from your domain of which you forwarded the emails.
Step 1 − Click on Add Domain Forwarder button, which can be found under Create an Email Forwarder of Forwarder interface.
Step 2 − In Add New Domain Interface, select the domain you want to forward.
Step 3 − In the textbox next to your domain, enter the domain on which you will be receiving the emails.
Step 4 − Press Add Domain Forwarder button to save the changes.
Delete an Email Forwarder
To delete an email forwarder, click on delete link corresponding to the forwarder you want to delete.
For Email account forwarder −
For Domain Forwarders −
It will ask for your permission before deleting the forwarders, click Delete Forwarder to delete the Email Forwarder.


