Create-professional-emails
You can create and manage email accounts for your domain from this panel.
- Create a new email address
- Set up your email on computer or mobile (mail client)
- Change your password
- Open and use your email directly from webmail
To create an email address for your domain, follow these steps −
Step 1 − Click on Email Accounts link found in your Emails section of the cPanel Home.
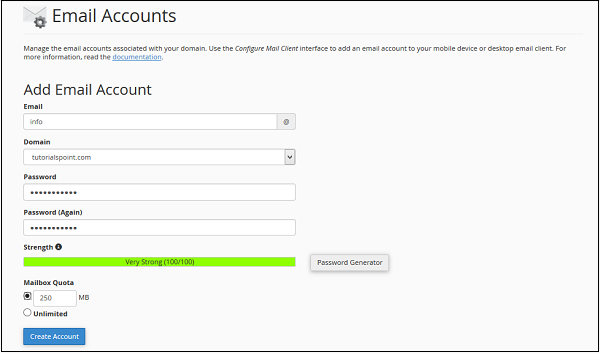
Step 2 − In Email Accounts, you will find Add Email Account on the Top.
Step 3 − Add Email name you want to create as it will be the text that comes before @.
Step 4 − Choose a strong password and supply Mailbox Quota. It defines how much disk space this account can use. You can provide specific amount of space in MB or you can provide an unlimited quota for this.
Step 5 − Click on Create Account to create an Email address associated with your domain.
Manage Email Accounts
You can manage your email accounts through this interface, you can change your passwords, change quota amount or delete the email account.
Manage Email Accounts in cPanel
You can manage all your email accounts (like changing password, quota, or deleting) from this interface.
Change Passwords
- Find your email address in the list.
- Click Change Password next to it.
- Enter the new password.
4.Click Change Password button to save
Change Quota (Email Storage Limit)
- Find your email address in the list.
- Click Change Quota next to it.
- Enter the limit in MB or choose Unlimited.
4.Click Change Quota button to save.
Configure Mail Client (Outlook, iPhone, etc.)
- Find your email address in the list.
- Click Configure Mail Client.
- You will see two options:
- Auto Configuration Scripts → Download and run (it will set up automatically).
- Manual Settings → You can set up manually (IMAP or POP3, with SSL or without SSL).
👉 Tip: Always use SSL (more secure). You can choose IMAP or POP3 depending on your need.
Once the interface is opened, you will see Auto Configuration Scripts.
You can download Auto Configuration Scripts for Configure mail client interface. Just download the appropriate settings and run it.
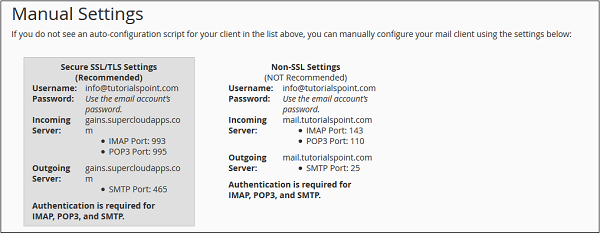
Or if you want to configure your mail client manually, you can scroll down to see the Manual Settings.
Note − There are four types of settings IMAP and POP3, both over SSL/TLS and Non-SSL too. Using SSL sends your messages with encryption providing extra layer of security, but Non SSL does not. It is recommended that you use settings with SSL. From IMAP or POP3, you can choose anyone you want. Both will work perfectly.
Delete an Email Account
- Find the email ID you want to remove.
- Click the Delete link next to it.
- A confirmation will appear.
- Click the Delete button to permanently remove the account.
It will ask for confirmation. Press the Delete Button to remove your email account.


