How to migrate cPanel/WHM from one server to another?
This guide explains how to migrate all your cPanel/WHM accounts from one server to another. Typically, you would do this when you need to replace your server. Here is the abbreviation we will be using in the whole guide:
Server A : Old Server
Server B : New Server
Prerequisites
- root access to both servers
- cPanel/WHM installed and configured on Server B (Use this guide to install cPanel/WHM)
- Check the following compaitablity issues:
- cPanel/WHM version should be newer on Server B
- Install any addons/plugins on Server B that you installed on Server A
- Database Version should be the same (If you want to upgrade, do MySQL/MariaDB upgrade after the transfer)
- EasyApache 4 packages on server B should include the packages installed on server A
- Edit Tweak Settings, MultiPHP Manager on WHM and make them similar or same as on server A.
cPanel Migration Guide
Automatic Migration
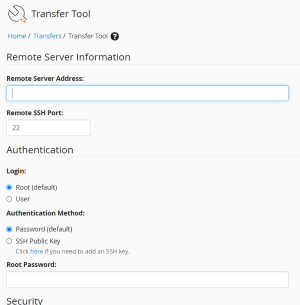
- Login to WHM and go to "Transfer Tool"
- Enter the public IP address or FQDN(Fully-Qualified Domain Name) hostname and root password or SSH Public Key.
- Click Scan Remote Server. (Also select Restricted Restore if you do not trust the remote server or it belongs to someone else. This would prevent any security incident.)
- Select all the accounts and the packages if you are transferring the whole server. Else, select the specific accounts and packages related to those accounts.(Do not select any service configurations as it breaks server configuration most of the time.)
- Click on Copy and the migration will be started. You do not need to stay on this page for the transfer to continue. (The transfer log can be viewed at any time by going to Review Transfers and Restores in WHM and clicking the Review link next to the transfer session ID that was started to review the progress)
The automatic migration is now complete.
Manual Migration
If the automatic migration is failing or your server A has gone in an unbootable state, try this method. (Do note that this method will have a longer downtime)
If your server was hacked and you want to migrate your cPanel/WHM, follow this guide:
Boot your server A into rescue mode/system or any alternative rescue OS or request your datacenter to do the same.
Login to the terminal using SSH. If SSH is unavailable, you can also use KVM screen or IPMI console.
Use the following commands:
root@rescue ~ # lsblkIf it's showing md1,md2, then you have a RAID setup. If it does display an output with md, then you do not have a RAID setup. Accordingly, mount the system to /mnt
In case of RAID, the following command can be used:
mount /dev/md2 /homeIf it's not a RAID setup, the following command can be used:
mount /dev/sda3 /homeDo note that you need to mount both the drives or RAID to the correct mount points for the solution to work. The mount point for the 1st drive or RAID setup is always
/homewhile for 2nd drive in a non-RAID setup, you have to check /etc/fstab file using the following command:cat /etc/fstabAfter mounting the drives, use the following command to switch to the root environment of the server A:
chroot-prepare /homeOR
mount -t proc proc /mnt/proc
mount -t sysfs sys /mnt/sys
mount -o bind /dev /mnt/dev
mount --bind /run /mnt/runthen
chroot /home
- Create a new directory to store the transfer data using the following command on server A:
mkdir /transfer - Run the following command to create a loop for backing up all cPanel accounts on server A:
for x in `ls /var/cpanel/users|grep -v \/`; do /scripts/pkgacct $x /transfer; done
- After the cpmove backups are complete, transfer them to the server B using any secure method like SFTP, SCP or FTPS. We will be using SFTP on server A.
cd /transfer
sftp root@serverb.com
cd /home
put *
- All the cpmove files are now transferred to /home directory on server B. Use the following command to restore all the cPanel accounts on the server B:
cd /home
for x in cpmove*.tar.gz; do /scripts/restorepkg --force $x ; done
For older cPanel versions: (Version 108 or earlier)
ls cpmove*.tar.gz | cut -d\- -f2- | cut -d\. -f1 | while read x ; do /scripts/restorepkg --force $x ;done
- This command will create a loop to list all cpmove files and restore them. After it's done, move the cpmove file to a different location for backup purpose or delete them. We will move them to
/restoredataon server B:
mkdir /restoredata
mv cpmove-* /restoredata/
The manual migration is now complete.
Making websites live again
After the transfer is complete, the DNS servers still serves the records from server A. To point all the websites to the new server, change the following:
- Nameservers A records
- Nameservers glue records
In case a cPanel DNS cluster was setup, just link the server B to the cPanel DNSonly server and push the new DNS records from server B.
In case any websites which were using third-party DNS like Cloudflare, their DNS records will have to manually be updated to point the websites to server B.
After the DNS is propogated, the websites should be live again. (DNS propogation takes a maximum of 5-10min and on average takes less than a minute)
